Author Topic: Safespots/Strategies  (Read 8346 times)

J.O.B

  • YOU CAN'T MAKE ME CHANGE
Safespots/Strategies
« on: May 17, 2010, 08:12:57 AM »
This is a thread where you can post your safespots on cards or a foolproof strategies for static cards.

Heartbeam

Re: Safespots/Strategies
« Reply #1 on: May 17, 2010, 02:34:13 PM »
A small suggestion if you weren't already planning something similar to this.  Should the thread really kick off you should create a list in your post dividing the games (possibly into individual stages) and have links to the posts.  Maybe the contributors can be creative and give a title for the safespots / strategies for you to use as a link.  I'd probably do something simple like Concerto Grosso -Easy- (safespot / scoring) and Endstage Youmu's Opener (micromemorization).

Likely only ever going to bother with PCB...I'll contribute later.
« Last Edit: May 17, 2010, 07:30:08 PM by Heartbeam »

Re: Safespots/Strategies
« Reply #2 on: May 17, 2010, 02:56:52 PM »
Sounds like a good idea. You can never have too much knowledge when playing games like these.

Heartbeam

Re: Safespots/Strategies
« Reply #3 on: May 18, 2010, 01:49:50 AM »
Hm, nothing else?  I was thinking this thread would be worthy of a sticky with enough information collected and organized.  Actually, I guess a list of links in the OP wouldn't cut it for organization.  Well, here's something for the time being.  Deadly Dance will be done eventually.

Oh yeah, disclaimers.  Don't take this as the end-to-be of all information and try to figure out other paths as well.  It's just stuff I learned and stuck with for better or worse.

Stage Six

Replays
Easy
Normal
Hard
Lunatic

Youmu's Opener (micromem.)

Just putting it up to acknowledge that it's a fixed pattern aimed at you.  Once you have enough control over your character it shouldn't be a problem.

Six Realms Sword "Ageless Obsession" (safespot)

An attack split into four repeating patterns.  That being said, the fifth wave and first repeat of the first pattern on Easy is noticeably different because of the lingering bullets.

Easy: Nothing you can't handle with reading on the spot.  It's generally easier to handle the third and fourth waves on the right side of the enemy marker.

Normal: Dodge the first two waves however you see fit.  The fourth wave seems easier to dodge on the right side again.  For the third wave you can refer to this position below.


Do note that the character isn't on the very bottom of the screen.  Last I checked you should be fine sitting on the bottom, but it really serves no purpose other than to tempt fate.

Hard: First two waves don't require any particular movesets, and the fourth wave is best handled on the right side of the marker yet again.  This method of safespotting the third wave still puts me on edge, but it's there if you want it and shown in the picture.  I'd prefer to sit on the 'y' (or very slightly to the right) and tap over to the left when the bullet passes over.


Lunatic: The first spot will handle the first two waves, and the second spot for the third.  Based on the image it's apparent that if you're going to overshoot when trying to land on the 'e', don't overshoot to the right.  The fourth wave is best handled to the left of the enemy marker this time.  Be ready to do a bit of (still small) moving and don't hug the bottom (you can do it and live, but still).


Yuyuko's Opener

Three different waves to work with.  They're definitely aimed in relation to you but I can't work it out exactly.  For kicks you can start the battle on top of her to send most of the attack off the screen.  I'd advise against this on Lunatic because the medium-sized bullets will still be around when the second wave is wailing on you.

The first three difficulties are pretty standard and don't require much planning on your part, but Lunatic isn't quite so charitable.  For the first wave you want to dodge anywhere to the left of where you were when the attack started.  The medium-sized bullets will be in a more favorable position.  The second wave has the potential to turn into a nastier attack if Yuyuko has to sweep to the right because of your position.  Still manageable on almost all occasions, but an unnecessary risk.  To never have to put up with this again simply make sure you're to the right of Yuyuko's enemy marker when the third wave ends.  You'll have the most space to direct Yuyuko left for her second wave variant and it's already easier to dodge to the left for the first wave.

Yuyuko has more than three positions to take for her opener so don't think that she'll always automatically move to the middle when she's to the right side and you're still sitting on her right.

Third Noncard (GHOAST KNIVES)

Easy / Normal / Hard: Hole yourself up in this corner and you're good to go on all three difficulties.  The only close dodge you should have to make is on Hard at the 30 second mark which happens to be in the picture.

You can sit in front of Yuyuko and blast away on Easy with little worry for the knives swimming around you.  If you don't stop for anything you'll finish the attack before the knives envelop your dodging area. 


Lunatic: Commonly (seemingly) brought up as a detracting point from the boss fight because of its wall-in tendencies for the uninformed player.  Even when you're aware that your current dodging area will have to move it's not so obvious when it's appropriate to do so.  I'm not going to say with certainty that the knives are static, and the bubbles definitely aren't because they're aimed, but the attack is predictable enough to pass everytime.


When first learning the attack I counted the incoming bubble waves to know when to look for an opening and move over.  Once I'm in my new dodging position I start the counting over.  Not all hope is lost if you don't move over when indicated by the second panel, but you'll have to try a little harder to get over (and look a little cooler in the replay).  For the third panel you can move over as the second or third wave of bubble bullets approach.

Repository of Hirokawa


Out of the few first 1cc / attempted 1cc replays I've seen the player usually overcompensates for the aimed bullets and leaves little room to create a gap.  Not to mention getting killed by the fixed pattern from time to time.   Here the pattern is free to be studied.  The important ones are the three coffin-shaped spaces in the middle as seen in Easy mode.  This doesn't change in the later difficulties other than getting smaller.  Use the background while you're getting used to the safe zones and be careful when a border is running; the background will be harder to discern.

The two streaming methods for this is the two-piece method in which the player jumps between both ends of the safe zones before the next wave starts, and the three-piece method which should be obvious enough; the player uses all three safe zones and streams slowly enough to not get trapped when turning around.  Remember, the butterfly wings are just fluff.

To-do:

-Youmu opener Easy
-Deadly Dance
  • Circling (graze), partial circling, standard
-Flowery Soul
  • Spirit behavior
  • Spirit explosion (graze)
  • Blue bullet function
-Repository of Hirokawa
  • Fixed pattern opener (graze)
  • Two-piece variant method (graze)
-Sumozime Perfect Blossom
  • Butterfly and bubble bullets
  • Bubble opener (graze)
-Resurrection Butterfly
  • Lasers and bubble bullets

-Information gathering and instruction clarification.
-Stage Six description.
-Video clip collection.
« Last Edit: May 23, 2010, 04:13:03 AM by Heartbeam »

Garlyle

  • I can't brain today
  • I have the dumb
    • Tormod Plays Games
Re: Safespots/Strategies
« Reply #4 on: May 18, 2010, 07:06:21 AM »
SA Extra.  "Bumper Crop Rice Shower"
You can sit in the center of Sanae's shots and they will miss.  However, this requires really precise positioning - you have to be slightly below the center and aligned near-perfect horizontally centered.  If you're not, one of the streams will be firing close enough that the raining bullets created will be able to hit you.

Re: Safespots/Strategies
« Reply #5 on: May 18, 2010, 09:11:32 AM »
I hope this thread achieves success. I'll most definitely be reading that stuff Heartbeam posted.

Azure Lazuline

  • Looooove!!
  • PM me for free huggles and love!
    • Entanma Project - indie game development
Re: Safespots/Strategies
« Reply #6 on: May 18, 2010, 09:28:11 PM »
Imperishable Night Extra's death fairy has a safespot in the lower-left corner, but only for Border Team. That's the only safespot I know of that hasn't been mentioned yet.

Re: Safespots/Strategies
« Reply #7 on: May 18, 2010, 09:35:06 PM »
http://www.youtube.com/watch?v=0ZXM5L75h38

Oops, didn't realize that Mystia one was in the vid too.
« Last Edit: May 18, 2010, 09:42:19 PM by Enigma »

Solais

  • Developer fairy
  • is working for a game developer now.
Re: Safespots/Strategies
« Reply #8 on: May 18, 2010, 09:41:55 PM »
Flandre's Starbow Break is completely optional thanks to the safespot under the "Enemy" sign. I think it's under the N letter.

Re: Safespots/Strategies
« Reply #9 on: May 18, 2010, 09:57:26 PM »
Flandre's Starbow Break is completely optional thanks to the safespot under the "Enemy" sign. I think it's under the N letter.
Im guessing you have to have the Retexture Pack to use this?
« Last Edit: May 18, 2010, 10:46:26 PM by Demonbman »

Re: Safespots/Strategies
« Reply #10 on: May 18, 2010, 10:14:50 PM »
Sapz's fourth attack has a safespot right beside the sprite but you have to rotate to avoid getting hit. Fifth attack's safespot is a bit to the left from the middle at the bottom of the screen.

This counts right? >:D

Heartbeam

Re: Safespots/Strategies
« Reply #11 on: May 18, 2010, 11:04:51 PM »
Im guessing you have to have the Retexture Pack to use this?

Not sure about the retexture patch, but here's a picture for vanilla EoSD.  The retexture patch also 'did away' with a few other safespots like behind Remilia's head if you're trying to graze the second noncard.  That was several months ago so I don't know if the sprites are any different or readjusted now.

« Last Edit: May 23, 2010, 04:10:28 AM by Heartbeam »

LHCling

  • Metang@
  • ( 。゚ 3っ   )っ
Re: Safespots/Strategies
« Reply #12 on: May 19, 2010, 12:06:35 AM »
Fifth attack's safespot is a bit to the left from the middle at the bottom of the screen.
Which only lasts for a certain period of time  :V

I'm also finding it interesting that the OP didn't start off by giving suggestions / examples / etc.

First and foremost, I'm a person who generally detests anybody using safespots unless it's for scoring. Just getting that out of my way.

Right, so in this post, I will cover UFO Stage 3. There are quite a number of safespots / blindzones that can be used, most with regard to Graze (or scoring if you will) however some have nifty applications when going for a "vanilla 1cc".

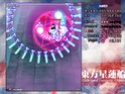
To begin, we have the start of the stage, with the fairy that shoots a load of bullets at you, all aimed at a single position. For best results in terms of grazing, simply circle around like so:

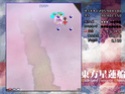
You could just simply tap-dodge but that's no fun at all.

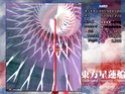
Next, we have Mid-Boss!Ichirin, whose lasers can apparently be a bit troublesome for some players. Here's a little pointer. It's a little messy, but it shows how the lasers are fired. This can be applied to all difficulties. Watch your vertical position (co-ordinate) though. With regard to scoring, Normal should be supergrazed from the top-right "between" the green and red / blue laser spawn points. Hard should be done as shown. I'm not too sure about Easy and Lunatic, as there appears to be changes here and there so I'll omit that for now.


Then, we have the Spell Card, which can be shotgunned at the start. How close can you get? Well, you can probably use an indicator like this (note: yukarin's replay):

...but I generally just use my own judgment.

Then! We have the large fairies, which have no collision box. This means they can be safespotted for a fair amount of graze. For best effect, grazing the initial should be done a little bit more to the left, and for survival, you should be shooting at all times and a little bit to the right. Because the right one drops a Red UFO.

A similar approach can be taken with the end of Stage fairies as well, however bear in mind the risk from aimed bullets, and ramming into the wall of bullets fired.

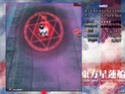
This then brings us to Boss!Ichirin. We all know about supergrazing the first Non-Spell, however for those who don't the spot is located approximately on the left lock of hair present on the sprite. Always the left. The lasers can also be grazed afterward however watch for collision with the bullets you just grazed or the laser spawn points or even Ichirin herself when doing this.


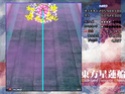
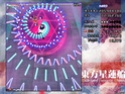
We then move on to... Ichirin's second Non-Spell. This can be done as far as I know, on all difficulties not named Lunatic. You start off on the right side and a bit below the center of Ichirin; the edge of the dress makes a somewhat good marker, and you graze in a L-shaped pattern like so:

It's also interesting to note that every even iteration (on Hard at least) has the aqua / teal bullets not "extending" as far as their odd counterparts. You can see here that I went a bit too far and lost some potential Graze which I could have gotten by circling around the inside of the wave.


Lastly, Unzan's eye in the last Spell Card. This one is appears to be tricky, but in reality it isn't. The best way to approach this is to move up. Moving into the eye horizontally (i.e. left or right, depending on which eye you go for) is risky business. There's also a bit of wriggle room inside the given spot.

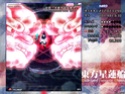
Note that for optimal Graze, luck is needed as the lasers fired are random.

And that's it. I think.
« Last Edit: May 19, 2010, 12:08:53 AM by Bai-tan »
[16:25] <Kuruminut> Shut up MS Word, "fangirlism" is totally a word
<>
[07:59] <Sapz> ベーティさんは馬鹿っぽいだろう、この「っぽい」好き者

Re: Safespots/Strategies
« Reply #13 on: May 19, 2010, 12:17:09 AM »
But those "safespots" are terrible for 1ccing as its harder to use them than it is to just do the attacks normally.

Heartbeam

Re: Safespots/Strategies
« Reply #14 on: May 19, 2010, 12:40:17 AM »
A safespot is a safespot!  Gotta document everything.  UFO was quite fun in that regard until you had to turn around and apply most of them to achieve optimal graze and...that's just great.

Quote
foolproof strategies for static cards

Would like to contest this but I don't think the OP will mind if ideas go through that aren't wholly stable.  Or I should say cards that are a mix.

It also goes back to the suggestion that the safespots and strategies should come with a label when being linked to.
« Last Edit: May 19, 2010, 12:43:38 AM by Heartbeam »

LHCling

  • Metang@
  • ( 。゚ 3っ   )っ
Re: Safespots/Strategies
« Reply #15 on: May 19, 2010, 12:54:05 AM »
But those "safespots" are terrible for 1ccing as its harder to use them than it is to just do the attacks normally.
By that logic, I could argue that 'BoWaP"'s safespot isn't a "safespot" at all; in most cases it requires 1 bomb (even then there's a risk of still colliding into something), else you end up taking a somewhat large risk entering said spot; furthermore I also believe that it's downright impossible to enter the safespot on lower difficulties without some invulnerability time (i.e. bombing).

Similar things could be said of "PSM" and its equivalents. Actually, that could be said of most if not all safespots.

A safespot is a safespot!  Gotta document everything.  UFO was quite fun in that regard until you had to turn around and apply most of them to achieve optimal graze and...that's just great.
I now feel I can relate to this after doing one such run and ending up with only a moderate score. It's great until you have to apply it in a normal run. Which is a very demanding task.

Would like to contest this but I don't think the OP will mind if ideas go through that aren't wholly stable.  Or I should say cards that are a mix.

It also goes back to the suggestion that the safespots and strategies should come with a label when being linked to.
It's all about precision unfortunately. Hence why they're actually called a safespot  :V

I can see where you're going with the second paragraph though.
« Last Edit: May 19, 2010, 01:09:15 AM by Bai-tan »
[16:25] <Kuruminut> Shut up MS Word, "fangirlism" is totally a word
<>
[07:59] <Sapz> ベーティさんは馬鹿っぽいだろう、この「っぽい」好き者

Re: Safespots/Strategies
« Reply #16 on: May 19, 2010, 01:43:56 AM »
Was able to enter the BoWaP safespot without bombing  or dying on all 4 difficulties. Don't see why you would think you wouldn't be able to.

It's not something I can consistently do though as I sometimes collide into Satori or position myself a little too low.

Re: Safespots/Strategies
« Reply #17 on: May 19, 2010, 02:22:08 AM »
I'm totally covering UFO Stage 2.


We'll start off with some basic tips and tricks for the stage. First off, at the start of the level, you can gain some additional graze off the second big enemy by circling around it as it shoots pseudo-aimed shots at you. It's not difficult to do, and will only require one or two tries to get it right. This spot is available on all difficulties, and is easiest to do in square movements, as pictured.


After the title images for the stage, you'll hit some slowly moving yin yang orbs. If you don't want to deal with the slow big bullets they leave behind when you kill them, you can move to the top of the screen for a while to drag them away from you (since they always move in your direction). After a while, they'll just drift off the screen and you wont have to shoot them. For score, it's best to kill them and collect the point items they leave behind.

After the ying yang orbs, many red fairies that shoot aimed bursts of bullets will attack you. On the right hand side of the screen, there is a special fairy that doesn't quite make it onto the screen. It drops a rainbow UFO, and the only way to kill it is to bomb with any character except Reimu A. With Reimu B and Marisa A, you'll need to be on the right side of the screen to hit it. Sanae A, B and Marisa B will kill him regardless of your position. Bomb about as soon as you see the yellow fairy that drops a UFO arrive from the right side of the screen.


Kogasa's first non-card has a rather large safespot that you can abuse for additional graze on Lunatic. It's right under her skirt, and you'll need to move quickly away from her after she shoots her flurry of bullets to avoid getting rammed. The spot is rather large and has a bit of wiggle room, so don't be afraid to adjust yourself if you think you're a bit too low. I've colored in the approximate area you have to fiddle around with, and remember that Marisa and Sanae have a larger hitbox so the safe area shrinks when you use them. Try not to go above Kogasa's skirt line, as this is about where her hitbox starts. This safespot doesn't exist on Hard or below (or is significantly smaller), so I wouldn't recommend using it on anything but Lunatic.


Despite me dying trying to get into the safespot for this screenshot, I swear it's not that hard :V

Parasol Star Memories has a safespot as well, and it's almost exactly the same as her first noncard. This time there's a little less wiggle room, as her purple bullet wave spawns a little closer to her body, so you're gonna have to get a little more personal with Kogasa's undergarments to pull it off. If you choose to use this safespot with Marisa A or Sanae B, you'll have to watch out for the orbs that you'll kill while you're in it, so it's much harder to pull off with those shot types. Fortunately for you, they have the easiest "regular dodging" of that card, so you probably don't need it in regular runs with them. Reimu B almost requires using this safespot (as you'll probably die/time it out otherwise), so if you're planning on score-running with her, you'd best learn it. Keep in mind that Kogasa can move down slightly after throwing her wave of bullets, so try not to get rammed. At two power and above, you should be able to kill the card after 3 waves of bullets (~10 seconds).


Kogasa's second non-card can be easily completed on Lunatic by dodging at roughly halfway between her and the bottom of the screen, and microtapping left or right. For Hard and below, you can hug the bottom of the screen and microtap-stream left or right. This non-card gives a lot of graze so don't resort to just bombing it because you can't handle Marisa's large hitbox or something, please learn to abuse this! I've seen more than a few good scoring replays on royalflare for Marisa and Sanae bomb this non-card. Here's the rough area you have to be in for Lunatic -- keep in mind that the further you are up, the less room you have to dodge.


And lastly, many people have troubles with Kogasa's train card. My general strategy is to move towards the right side and up to completely avoid the light blue amulets, then move straight over to the left side.

I'll then go down to the left side (hopefully fast enough to completely avoid the light blue amulets again), then move back and forth near the bottom of the screen, leaning more towards sides that don't have orbs flying by. I find a little higher than the bottom of the screen works best for dodging, around the yellow line.


Yeah I have a bad score on that card. I'm making this tutorial on my laptop, and man I suck playing on my laptop :V
Though honestly, I'm really bad at reading the blue amulets and have a bad score on the card anyway...

That's about it for this stage, other than UFO routes. There are many different UFO routes so I won't bother reviewing them, but if you're going purely for survival, you can ideally get 7 total lives by the end of Kogasa, though six and a bit is more practical (and doesn't need bombs). For score runs, Kogasa is great for graze milking, and is substantially easier (though less profitable) than Ichirin.
« Last Edit: May 19, 2010, 02:25:57 AM by Naut »

Re: Safespots/Strategies
« Reply #18 on: May 19, 2010, 02:24:51 AM »
Hey guys I just found out soemthing when u fight Cirno on ez modo on her spell there is a safespot RIGHT IN FRONT OF HER!! :getdown:

LHCling

  • Metang@
  • ( 。゚ 3っ   )っ
Re: Safespots/Strategies
« Reply #19 on: May 19, 2010, 02:42:33 AM »
Hey guys I just found out soemthing when u fight Cirno on ez modo on her spell there is a safespot RIGHT IN FRONT OF HER!! :getdown:
This is a NEW AND EXCITING find why did you cross it out?  :getdown:

:wikipedia:
Let's see...

Boss!Kogasa's first Non-Spell does have the safespot on Easy and Normal. It's a shame that Hard is the exception in this case  :V
Mid-Boss!Kogasa also has similar safespots for Easy and Normal, and said spot does not exist for Hard and Lunatic.

Was able to enter the BoWaP safespot without bombing  or dying on all 4 difficulties. Don't see why you would think you wouldn't be able to.
Because I tried and couldn't pull it off? It probably concreted as well considering that most players do indeed bomb before entering (even on Royalflare).

It's not something I can consistently do though as I sometimes collide into Satori or position myself a little too low.
This however, proves my other point I believe.
« Last Edit: May 19, 2010, 02:44:37 AM by Bai-tan »
[16:25] <Kuruminut> Shut up MS Word, "fangirlism" is totally a word
<>
[07:59] <Sapz> ベーティさんは馬鹿っぽいだろう、この「っぽい」好き者

J.O.B

  • YOU CAN'T MAKE ME CHANGE
Re: Safespots/Strategies
« Reply #20 on: May 19, 2010, 06:06:17 AM »
By foolproof I meant it should work for at least 75% of people.

Re: Safespots/Strategies
« Reply #21 on: May 19, 2010, 01:25:05 PM »
http://replays.gensokyou.org/download.php?id=8791

It should work on the first nonspell as well. Though I do wonder how exactly it works as Orin seems to be giving me hell about the positioning, so  I can't even repeat it.

Bananamatic

Re: Safespots/Strategies
« Reply #22 on: May 19, 2010, 02:14:52 PM »