Author Topic: Adventures in Cosplay!  (Read 192703 times)

draganuv15

Re: Adventures in Cosplay!
« Reply #240 on: October 18, 2011, 10:22:24 PM »
with UK it isn't cosplay. it's prosplay.

you bet your ass it is, even though i don't cosplay ?? we are bunch of perfectionists in the UK :3

Bobsixtyfour

Re: Adventures in Cosplay!
« Reply #241 on: October 19, 2011, 05:07:05 AM »
Moar progress on the v2 P-Pillow.

Pinning both sides together to line them up....


Beginning sewing action! Ouch those pins should have been more strategically placed, like sticking your hand on a cactus T.T


What P-Pillow is evolving!


Yay, correct sides outwards! Stuffing time!


Stuffed!


Not pictured: Painstakingly sewing closed the stuffing entrance.

Comparison to the v1 pillow!


Done! Yayifications!
« Last Edit: October 19, 2011, 05:10:00 AM by Bob64 »

Bobsixtyfour

Re: Adventures in Cosplay!
« Reply #242 on: October 19, 2011, 05:07:53 AM »
oops double post

gammaraptor

  • i won't depend on anyone anymore
Re: Adventures in Cosplay!
« Reply #243 on: October 19, 2011, 02:52:17 PM »
point item time!

Bobsixtyfour

Re: Adventures in Cosplay!
« Reply #244 on: October 20, 2011, 09:52:36 PM »
Actually, I'm gonna shift gears a bit and try machining a Tokin hat (the red hat that Aya/Momiji wears) out of wood as my next project.

Spent the last few days figuring out some rough plans... Decided to try making it 6 sided, to make it more symmetrical with the little red strings (with the white poofs) on each side. (if it looks like shit when its done, i'll redesign and move to a 5 sided one)


So yesterday I dragged tablesaw from my basement to the garage... Devised a cardboard funnel to connect with the shopvac....(really, its more of a thing that prevents sawdust from falling on my feet and in my shoes)


Decided to start cutting today except.... CAN'T FIND MITRE SAW to cut this 8 foot stud down to managable size! (~2.4inchesx6 = 14.4 inches needed!)
Blah, so decided to see what I can do with some scrap pieces of studs.

Started cutting the curved edges from the studs...


Left extremely thin strips of wood on the ground...


Stack of "done" pieces


Started cutting out the walls of the tokin... (1/2 inch thick!) (these scrap wood pieces are too small to "pull out" from the other side - better use a push stick.)


Remember kids, use a push stick (and other safety equipment)! That could have been my finger lolz. (these wood pieces are too small to "pull out" from the other side.)


Using a push stick...


What the... Gosh my table saw sucks. (they're not the same height). Sigh. Might have different results if i used one big piece and went straight through.


At least the walls of the tokin faired better. Need to find my mitre saw so i can mitre the edges and join them together....
« Last Edit: October 21, 2011, 04:05:25 AM by Bob64 »

Jq1790

  • Wow I'm back to playing this game.
  • Let's puzzle together again, Karin!
Re: Adventures in Cosplay!
« Reply #245 on: October 21, 2011, 04:01:42 AM »
Actually, I'm gonna shift gears a bit and try machining a Tokin hat (the red hat that Aya/Momiji wears) out of wood as my next project.
Don't give yourself splinters and stuff in your hair/head if you're making it to actually WEAR, hm?  That'd suck.
If you're a Pazudora player and aren't on #puzzleandlibrarians, come join us!

Bobsixtyfour

Re: Adventures in Cosplay!
« Reply #246 on: October 21, 2011, 04:16:46 AM »
Don't give yourself splinters and stuff in your hair/head if you're making it to actually WEAR, hm?  That'd suck.

That's what sandpaper is for :V

So yeah, since all the pieces were lol different sized... decided to re-machine a slice from a single stud. I guesstimated about 15 inches (each triangle is 2.31 inches wide * 6 = 13.86, hopefully leaving a large enough blade-allowance)...


Turns out my friend's miter saw has a very handy laser... It's calibrated so it shoots exactly where the left side of the blade stops.... Too bad there's not another laser on the other side of the blade. Since the angles were 30 degrees and the shape is symmetrical, I found out that I could just flip the wood over instead of moving the miter saw back and forth, Huge time saver and probably made all the angles ungodly accurate. (since the left side is laser-guided, the right side doesn't have that... so I'd probably be forced to guesstimate where the blade ends (bad for accuracy).


pieces completed and loosely arranged... Sorta looks like a Hakkero (MASTER SPARKU~)! (pieces fit very nicely together, only hampered here by sawdust and other stuff in the way)


As for the "roof" of the tokin... ran into a problem... Turns out i needed such tight clearances... the blade would hit the fence... Nothing a little ingenuity couldn't fix...


FFFFFFFFFFFFFFFFFFFFFFfffffffffffffff

Failed to account for the little knot there... and it fell out while cutting.

Started cutting it on the miter saw... ARGH, first piece chipped. Another problem is that the laser doesn't hit the side facing me due to the slope T.T Lowering accuracy of my cuts even further.


Blah, due to the knot, lost 2 more triangles. Then I got to the end... and FFFFFFFFFFFFFFFFFFFFFFffffffffffffffffff!! Failed to account for the lack of a guide near the place where the saw cuts.... Meaning no way to stabilize the piece of wood while cutting... and fingers in that area is a no-no.


Sigh, out of a piece that was supposed to poop out 6 triangles.... only 3 came out... 1 of which had a chipped corner.
Pulled out the spare pieces from yesterday (previous post)... and table-saw'd them to the correct angle... and then miter'd them.

Blah, none of the pieces fit exactly snug. (see the dark lines, those are gaps). Nothing close to the fit I've achieved with the above side pieces.... I also have a feeling the mitre saw isn't perfectly 90 degrees.... Damn it. That and the pieces are probably off by a mm or two since I had to guesstimate where the blade ends (couldn't do the flip-over-trick like on the sides)


Looks like I'll have to re-do the roof.
« Last Edit: October 22, 2011, 07:21:07 AM by Bob64 »

Re: Adventures in Cosplay!
« Reply #247 on: October 22, 2011, 07:20:39 AM »
I thought it was square, not hexagonal ... :o

Bobsixtyfour

Re: Adventures in Cosplay!
« Reply #248 on: October 22, 2011, 07:23:24 AM »
I thought it was square, not hexagonal ... :o

nope. If you look closely, it has 3 sides that you can see... which means it has 5-6 sides.


Anyway, decided to try gluing the pieces together (even the fail-roof)...

Test fit with rubber bands to hold it together. Not bad if I do say so myself...


Wanted to try gluing all pieces at once... but didn't wanna risk one part drying while the whole thing is "open" and then screwing up the alignment. (hopefully this doesn't bite me in the ass later).


Perhaps the fail roof can be salvaged with some sanding...
« Last Edit: October 22, 2011, 08:29:29 AM by Bob64 »

Re: Adventures in Cosplay!
« Reply #249 on: October 22, 2011, 09:36:26 PM »
Oh! B'duh, I was thinking Keine for some reason instead of Aya.

Momiji

  • Cya
Re: Adventures in Cosplay!
« Reply #250 on: October 23, 2011, 04:21:11 AM »
Some people do draw 4-sided tokin, but 6-sided ones look cooler.

shurcle

  • You can nom on yourself sometimes!
Re: Adventures in Cosplay!
« Reply #251 on: October 23, 2011, 05:03:46 AM »
More progress (progress is slow T.T)

Yay, all 4 corners sewn together! Barely notice any heavy distortion or pinching of the fabric around the corners!


Now for the center piece....

Rear of it:


The red border now... with a new technique to help align and keep the corner fabric "bunched up evenly" while presewing... Time will tell if Frankenstein here will be effective...


More pre-sewing before I sew. Hum, dirty hands... luckily this marker washes off pretty easily.


The brainszz of Frankenstein! Actually the center P curve >_<. Stupid alignment. This stupid P took the longest to sew since it kept on shifting a bit while handsewing - then it'll screw up the alignment and bunch the fabric a bit. Had to redo this 3 times. Not sure if I want to do the P last... since all the extra fabric made it harder to maneuver during the machine sewing stage.


IT'S ALIV- I mean done! Not bad! Also took the time to fix the ugly corner on the first side (this was the 2nd side).


Casualties of the war so far: Poor softsoap was depleted in this project. And using a toiletpaper roll as a pincushion? F*cking smart.


This makes 2/2 sides done. All that's left is to trim the seams a bit and then sew them together (hopefully remembering to leave a gap to stuff with XD
I think I should attempt going to the fabric store and making a pillow.
This is going to be so much better than those L4D health kit pillows....

Jana

  • mrgrgr
  • *
Re: Adventures in Cosplay!
« Reply #252 on: October 23, 2011, 05:09:17 AM »
My sister has a 4-sided tokin for her Hatate, but it's :povertycosplay:
She already told me that she wants to redo it from the ground up, so maybe this will be useful for her.

Momiji

  • Cya
Re: Adventures in Cosplay!
« Reply #253 on: October 23, 2011, 05:23:43 AM »
My sister has a 4-sided tokin for her Hatate, but it's :povertycosplay:
She already told me that she wants to redo it from the ground up, so maybe this will be useful for her.
HATATE MUST HAVE HER HATATOKIN  :D

Gramity

Re: Adventures in Cosplay!
« Reply #254 on: October 23, 2011, 04:42:39 PM »
My sister has a 4-sided tokin for her Hatate, but it's :povertycosplay:
She already told me that she wants to redo it from the ground up, so maybe this will be useful for her.

Cosplay don't need to cost millions ! well I always show those on Irc but I would better like to have one that I made with my own hands(talentless thought)
since those are the best cosplay :D

Bobsixtyfour

Re: Adventures in Cosplay!
« Reply #255 on: October 24, 2011, 01:47:02 AM »
Update:
Fail roof is fail. (test fit)


Gluing the base.


Machining another roof.... Cutting off the rounded edge...


Wonky cutting work-around again. :D


Laser guided "precision cutting".


Final cut Jury-rigged "one-time-use" support mechanism.


12 roof components. (enough for 2 hats)


Test fit (held together with tape), placed on the base.

Mimachiro

  • Master of the Swimsuit
  • Making being an evil spirit look good
    • Tondemonai
Re: Adventures in Cosplay!
« Reply #256 on: October 24, 2011, 04:04:00 AM »
Nice work on getting it to finally work. :3

"I don't have anything against you, but I hope you're ready to die a dog's death!
Oh, don't worry, that cat will carry off your body, so you'll be able to live in our place!"

Bobsixtyfour

Re: Adventures in Cosplay!
« Reply #257 on: October 26, 2011, 05:07:33 AM »
More pictures!

Scale of things. (Testfitted by tape)


I like how this one makes a spiral.... Numbered for easy re-assembly if I take em out of the tape.


HMMMm.... it makes a cool looking gear thing when I remove one of the pieces of tape and lay it flat.... might work for easy gluing too!


Not Pictured: Gluing + emergency disassembly (wasn't setting right, since the only thing keeping it together was tape)

While roof 1 was soaking in water to un-glue the pieces... Decided to try the same technique on roof #2... except with some rubber-bands...


Base #2 being glued...


Sanding roof #2... Why the black marks you ask? So I can see if there are any low spots or whatnot that hasn't been sanded yet.


Yup, sanding the sides with 40 grit sandpaper...


Sanding with 100 grit


Not pictured: Sanding with 220 grit.

Gluing sanded pieces together...


Sizes


Drilling holes to poke the strings through... Pity I don't have a drill press... one of the holes is 1.5mm off.


The inside looks like this


Just needs a bit more sanding and then it'll be pretty much ready to paint, but alas it is 3am...
« Last Edit: November 04, 2011, 05:57:29 AM by Bob64 »

Gramity

Re: Adventures in Cosplay!
« Reply #258 on: October 26, 2011, 10:02:08 PM »
Great :D seem a little big though (I might be wrong too) :D

Zakenna

  • fomer Internet tough guy
  • Ahh After 10,000 years I'm free!
    • polyvinylcrush
Re: Adventures in Cosplay!
« Reply #259 on: October 26, 2011, 10:12:19 PM »
hey bob, are you going to stain it or paint it? because it'd look pretty wicked stained but you'll have to special order some cherry red wood stain and if you paint it you're going to have to seal the wood grain so it doesn't just soak up the primer (I built and painted arcade sticks for a hobby a few years ago)
« Last Edit: October 26, 2011, 10:14:33 PM by Zakenna »

Bobsixtyfour

Re: Adventures in Cosplay!
« Reply #260 on: October 26, 2011, 10:59:02 PM »
Uhoh. I assumed that the primer would seal the wood grain? I got a nice gallon sized thing of kilz 2 primer...

Edit:
Righty-o, so after chatting with Zakenna, decided to try out his techniques (will delay this project by a few weeks, but should make it look godly in the end)...
Technique basically consists of the following steps:
Sand wood to 220 grit,
spackle, wait to dry (1 day), sand spackle to 400 grit,
prime (2 layers), wait to dry (1 day), sand to 400 grit,
prime #2 (2 layers) wait to dry (1 day), sand to 400 grit,
If still bumpy or if I cut through to the spackle, prime #3 (2 coats), wait to dry (1 day), sand to 400 grit,
spray red paint (6 thin layers), wait to dry (3 days), wetsand red 400grit,
spray red paint #2 (6 thin layers), wait to dry (3 days), wetsand red 400grit,
apply clearcoat (6 thin layers), wait to dry (4 days), wetsand 600grit, wetsand1000grit, wetsand1500grit, wetsand 2000grit, polish


Oh yay! My dad has some leftover spackle!


Lets open it up and get some out to---
[NSFW]http://i11.photobucket.com/albums/a199/Bobc64/tokin/IMG_0336.jpg[/nsfw]

:barf: HURRRRRRRRKKKKKLLZ

Yeah, Totally gross. Not going to use it, so off to the store to buy some fresh spackle! (I later found out that this layer needed to be more even and thicker and probably applied with a finger rather then a putty knife)


Girls are now waiting (for it to dry).... And sanding time (220 grit)!


And time to prime!


Girls are now drying....


Turns out my humidity was at 80% and the primer was taking forever to dry... so busted out the dehumidifier and the heater...


Next level suspension apparatus for even drying, cuz I'm stupid.


Girls are now drying....

After sanding with 400 grit sandpaper. Resting on top of my custom painting support apparatus!


Priming #2.
« Last Edit: October 28, 2011, 06:17:39 AM by Bob64 »

Mimachiro

  • Master of the Swimsuit
  • Making being an evil spirit look good
    • Tondemonai
Re: Adventures in Cosplay!
« Reply #261 on: October 30, 2011, 02:00:14 AM »
Looking good, bob. The finish is going to be epic. :3

"I don't have anything against you, but I hope you're ready to die a dog's death!
Oh, don't worry, that cat will carry off your body, so you'll be able to live in our place!"

Grimarg

  • B-but you haven't promoted me yet!
  • Thanks Aoshi for the avvy! :3
Re: Adventures in Cosplay!
« Reply #262 on: October 31, 2011, 02:56:01 AM »
I have a pic from today

http://a7.sphotos.ak.fbcdn.net/hphotos-ak-ash4/s720x720/391109_167460363346821_100002485752701_318226_1968689843_n.jpg

Oh yeah, and maybe a friend will cosplay as Kaguya, the only thing is that she's  much more taller than me

Tamashii Kanjou

  • If you didn't quite already know...
  • *
  • I am the leader of TCF <3
    • TCF's Gaming Channel
Re: Adventures in Cosplay!
« Reply #263 on: November 01, 2011, 12:13:47 AM »
Okay... I'm going to need some serious help or advice with this one...

How would one go about making a giant, fluffy tail? For those who need the reference, it's Mamizou.

I mean, I'm not sure if these things exist somewhere or not; possibly not. So having to do one from scratch would probably make it my first attempt at making a cosplay.

Advice and pointers highly helpful. Thank you~

Grimarg

  • B-but you haven't promoted me yet!
  • Thanks Aoshi for the avvy! :3
Re: Adventures in Cosplay!
« Reply #264 on: November 01, 2011, 01:58:44 AM »
i would make a basic structure out of strong wires and cover it with fake fur and then stuff it, the problem would be how to attach it, pinning it some way seems to be the ideal way

チソウ タイゼン

  • tarzan cheetos
  • you'll thank me for the cropping later
Re: Adventures in Cosplay!
« Reply #265 on: November 01, 2011, 03:31:00 AM »
Nothing on Halloween?
If there is, can someone direct me to it >_>

My girlfriend graciously agreed to make a Reimu outfit for my little sister :V

This was her idea. She is eight.


best sister


NEVER MIND THIS I CAN'T FIND THINGS EVER
« Last Edit: November 01, 2011, 03:56:09 AM by Chisou Taizen »


ふねん1

  • Scientific editor
  • If you're alive, you can always keep moving.
Re: Adventures in Cosplay!
« Reply #266 on: November 01, 2011, 03:33:53 AM »
Nothing on Halloween?
If there is, can someone direct me to it >_>
Here.
"Science is more than a body of knowledge. It's a way of thinking." - Carl Sagan

NEW AND IMPROVED YOUTUBE, now with 60 fps Touhou videos! Latest video update: WBaWC Lunatic/Extra no-miss no-bomb no-Roars no-Spirit-Strikes compilation.

チソウ タイゼン

  • tarzan cheetos
  • you'll thank me for the cropping later
Re: Adventures in Cosplay!
« Reply #267 on: November 01, 2011, 03:54:57 AM »
Excellent, thank you. Now it would be cool if these two posts could be removed D:


Grimarg

  • B-but you haven't promoted me yet!
  • Thanks Aoshi for the avvy! :3
Re: Adventures in Cosplay!
« Reply #268 on: November 01, 2011, 04:17:13 AM »
Cute sister is cute

down here we don't have halloween, but the pic I posted before was the sunday, so I guess that counts

Bobsixtyfour

Re: Adventures in Cosplay!
« Reply #269 on: November 01, 2011, 08:58:37 AM »
Yeah, so anyway, after starting to sand the primed layers... found that it really clogged up my sandpaper - even after 24 hours of drying at 41% humidity and heat set to 75degrees. That and when I would sand it thin enough for perfection, it would suddenly get "torn" off like a paint chip. ARGH. Yes, the first thing you might think is that I didn't clean the surface before priming, but I'm pretty sure I wiped it down pretty good. Conclusion: Kiltz primer isn't sand-able. Doh.

So I reset it back by sanding both of the pieces back to wood. Damn it. Oh well, at least I didn't waste any more of my expensive 400 grit sandpaper (3 sheets irrecoverably clogged with primer clumps... blah).

More bad news: Today, when cutting the base pieces of tokin#3, I accidentally cut my metal ruler, destroying both the ruler (it's in 2 pieces), the miter saw blade (tons of chipped teeth), and the strip of wood that I was fabricating the base out of. One of the ruler pieces landed 20 feet away outside in the grass. Spent 20 minutes looking for the other half of the ruler.  :( FML. Luckily, none of the pieces hit my car, which would have been extremely devastating... And even more luckily I was also wearing my gloves, I have the feeling that the impact of the ruler/wood may have pushed my glove into the path of the blade as it was slowing down. >_<;;;

Btw: Cost of Tokin materials thus far:

From Home Depot/Walmart/Sears
~8 foot stud ~3$ (can make like 3 tokins)
Pack of mixed grade 80-220grit sandpaper ~8$ (probably only will use up like 1/4th of it)
Bottle of Gorilla Wood Glue ~4$ (suprisingly cheaper then elmer's wood glue, probably will use up only 1/10th of it)
Fancy Red Spraypaint: ~4$ x3
Lacquer Clear: 4$
Gloss Clearcoat: 8$ turns out this was uselessly stupid as it doesn't sand well.
Kiltz Primer: ~13$ (turns out this was useless, but oh well, I'll use it later for something else)
Spackle 14$ (Big thing of it, but me or my dad will use it later) Probably used like 1$'s worth for this project
400 grit sandpaper: 4$ (for 4 big sheets! pricy!!)
400 grit sandpaper (wet/dry type): 6$ for10 sheets (probably 1/3rd the size of the bigger sheets - pricy)
800 grit sandpaper (wet/dry type): 6$ for10 sheets (probably 1/3rd the size of the bigger sheets - pricy)
Terry Towels: 11$ for a 24 pack

From Advance Auto Parts:
1000 grit sandpaper (wet/dry type): 5$ for 5 sheets (probably 1/3rd the size of the bigger sheets - very pricy!)
1500 grit sandpaper (wet/dry type): 5$ for 5 sheets (probably 1/3rd the size of the bigger sheets - very pricy!)
2000 grit sandpaper (wet/dry type): 5$ for 5 sheets (probably 1/3rd the size of the bigger sheets - very pricy!)
Polish Compound: 7$ (I think it's equivalent to 4000 grit) got a better one
Meguiar's Rubbing compound: 10$
Meguiar's polishing compound: 10$
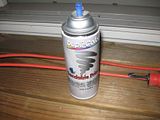
Sand-able Primer Spraycan: 5.5$ x3

Material Costs (some of the materials can probably be used for another project later on): 128.5$ = ~36.17 per tokin. Pricy.

Accidental damage:
10 inch miter saw blade: 14$
Awesome Metal Ruler: No idea how much this costs, probably irreplaceable as this was a (very nice) gift :(

Total cost (including damage) thus far:
$122.5

----------------------------------------
A non-fancy finish painted version would probably cost way less:
~8 foot stud ~6$ (can make like 3 tokins)
Pack of mixed grade 80-220grit sandpaper ~8$ (probably only will use up like 1/4th of it)
Bottle of Gorilla Wood Glue ~4$ (suprisingly cheaper then elmer's wood glue, probably will use up only 1/10th of it)
Fancy Red Spraypaint: ~4$
Gloss Clearcoat: 8$
= $30 for 3 tokins.
----------------------------------------

Sigh. The things I go through for perfection. :V

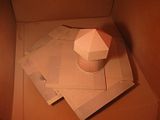
Girls are now stripping off the crappy primer....


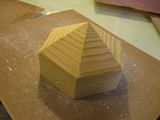
Re-spackling and dryin.


Not Pictured: Sanding spackling down

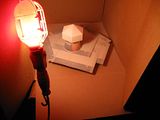
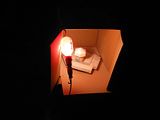
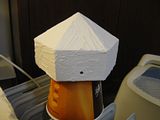
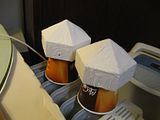
Next level priming apparatus! (Made from a random box, small lazy susan covered with many sheets from one of those free paper mousepads for taking notes). Yes, I'm priming at 4am.


« Last Edit: December 06, 2011, 06:43:28 AM by Bob64 »